Adding an Assignment
Now that the case, cases, or empty case resides on the Cases tab awaiting your use, you can pack the Assignments full and place them in your course.
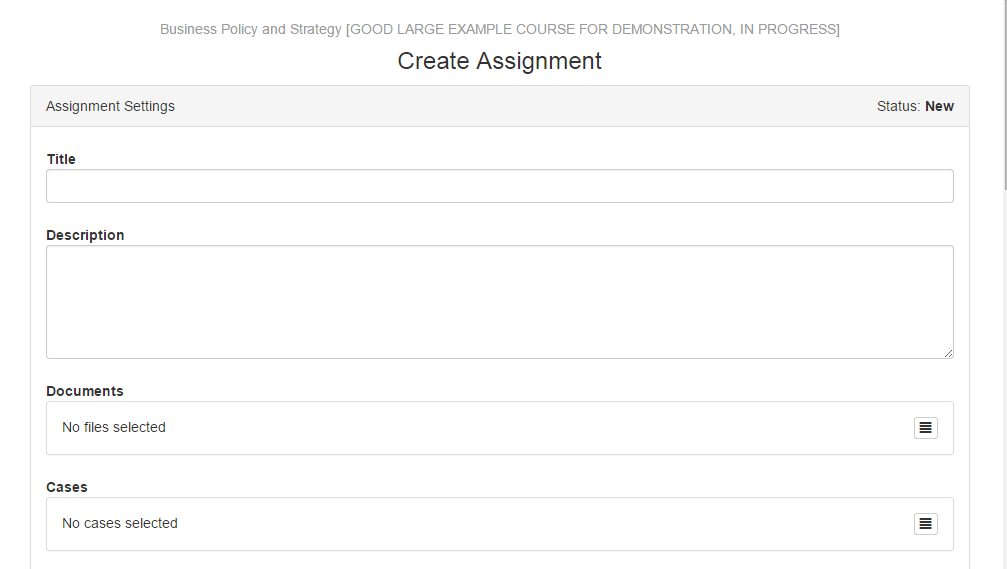
To create a new assignment, navigate to the Course Homepage and click ![]() . The Create Assignment page displays.
. The Create Assignment page displays.
Fill out the form with information previously documented in the planning process. Below are descriptions of each field.
Assignment Settings
- Title – Assignment Title, displays to students uniquely identifies this assignment from the rest
- Link – The link to the assignment that you can post to your LMS or emailed to students. Note that Mobius SLIP sends automatic email reminders to each student with their individual links to assignments.
- Description – Assignment Description, students see this text on the Assignment tab when they open the assignment. May contain assignment instructions and external URLs. You can:
- Use this space to contain the entire assignment instructions OR
- Use this space to give an introduction to attached case
- Documents – files that may be included separate of the cases, which all students will see. An example of this may be a rubric or score sheet.
- To add file(s), click
 and upload each file via
  .
. - Use the paperclip to attach the file to the assignment.
- Use the trashcan to delete a file.
- Use the minus sign to remove a file from the assignment.
- To add file(s), click
- Cases – discussed in the cases section. Add an empty case, or the number of cases you prefer to the assignment.
- To attach cases, click ; the list of all cases displays.
- Use the paperclip to attach the case.
- Use the minus sign to remove a case from the assignment. To delete a case from your account, return to the Cases tab.
- To attach cases, click
- Grouping pattern – Mobius assigns groups based on the option selected
- Random – a random designation calculated by the system
- Manual – you, the instructor, chooses the group assignments. May be helpful for team projects
- Earlier assignment – for each subsequent assignment after the initial assignment, you may choose to have Mobius keep the peer groups exactly the same.
- Desired Group Size – choose the number of students you wish to have in each peer group. Mobius SLIP will not always be able to mathematically assign exactly that number to every group; however, it will group as close to that as possible.
- File attachment in Submission – assignments in which the Submission requires a type of document other than an essay, such as a chart, a graph, a piece of art, an Excel spreadsheet or a PowerPoint presentation, should have this box checked. It will allow students to upload up to a 10 MB file. Remember: Students must still type something in the written submission text box, “File Attached,” for example to successfully Save and Submit their work.
- Written Submission – for Submissions which can be plain, unformatted text, students may type or copy and paste their work into the Written Submission box. Choose a number of characters appropriate to the length of the Submission. Entering a number causes Mobius to dynamically calculate the approximate number of words. The default is 30,000 characters, which calculates to approximately 5000 words.
- Peer review phases – Mobius SLIP allows you, the instructor, control over the number of assigned phases.
- Full Double-Loop Review (Recommended) – the original intention of Mobius SLIP, to provide double-looped peer assessment. Entails the Submission, Review and Reaction phases, completed by the students.
- Single Loop Only (Disable Reaction) – Students complete only the Submission and Review phases. They do not React to Reviews given by their peers.
- No Peer Review (Disable Review and Reaction) – students turn in a Submission and thus complete the assignment. Useful for collection of Submissions, which can then be graded by you, the instructor, using the Content Analysis tab.
- Deadlines – Using the deadlines mapped out in the planning phase; enter the dates and times for each field. Use the calendar to ensure correct formatting of the dates.
Now, you just completed the main portion of the assignment. Next, we set up how Mobius grades the assignment and the optional, yet useful feature, called Learning Objectives.
Assignment Grading
To change the default grading options, click the Grading Settings bar to expand it.
The following is an explanation of the fields:
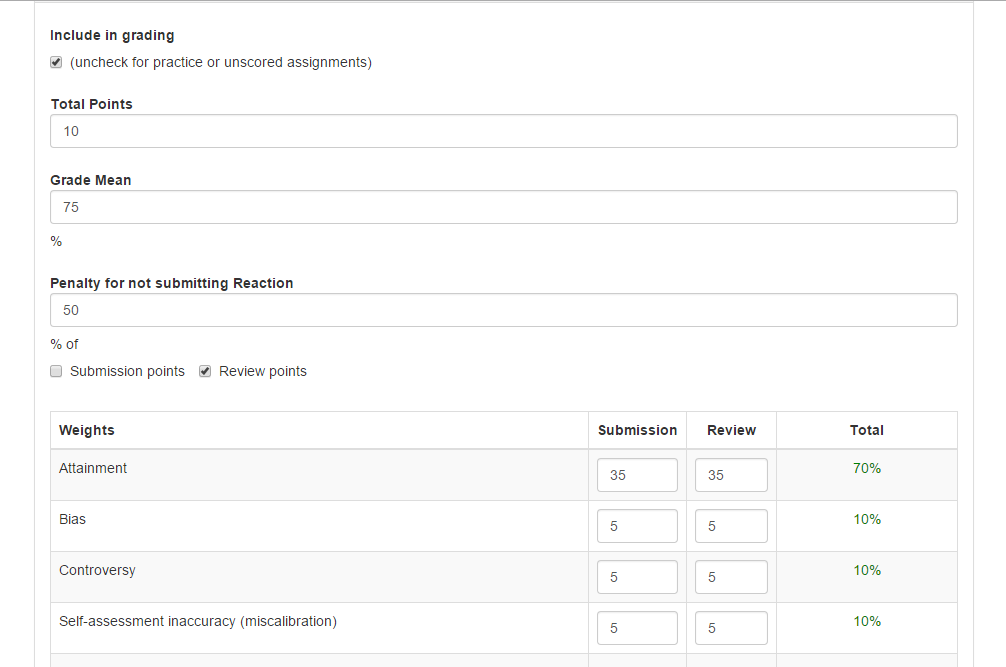
- Include in Grading – if this is a practice assignment to acclimate students to the workflow, uncheck the box. If it is a graded assignment, leave the box checked.
- Total Points – the maximum points to be earned for the assignment. Later assignments may be worth more, or all assignments may be weighted the same. Students accumulate points as each assignment completes.
- Grade Mean – the point around which the bell curve forms. Typically 50% of students fall above this mean and 50% below. Raising or lowering the grade mean ultimately raises or lowers the overall scores received by the students.
- Penalty for not submitting Reaction – you may take points away from students who complete the first two phases, yet fail to complete the third. This is a way of assuring that students complete all three phases, as not completing one of the other two penalizes them naturally in the system.
- The Number in the box is the percentage of points to take away,
- The check boxes allow you to take away the percentage of points from either the Submission the Reaction or the Submission and Reaction.
- Weights – adjusting these percentages places emphasis on certain Analytics while removing emphasis from others. For a detailed understanding of Analytics, refer to the Analytics Explained and Analytics Handout.
- Student Summary View Settings – these check boxes allow you, the instructor, control over which statistics you wish for your students to view. You may select all or none. You may reveal the statistics, which you define as important. Many different scenarios are possible and should be considered based on your needs.
Learning Objectives (Optional)
Learning objectives may be added as rubric by which your students may guide themselves when giving Reviews. Default Learning Objectives may be loaded or you may create your own.
Adding Learning Objectives
Click the Learning Objectives bar, following the Grading Settings, to open the Learning Objectives.

Click Add New LO to create your own Learning Objective or click Add Default LO to add pre-loaded learning objectives, which you may modify or use as an example when creating your own.
A learning objective consists of three parts, Title and Description, Rankings, and Categories.
- Title – the learning objective, usually a word or short phrase
- Description – describe the LO.
- Excellent-Very Poor – these five Rankings match up to those seen on the SLIP Slider bar during the Review and Reaction phases. Enter descriptions of what each level of quality a Submission or Review looks like.
- Categories –each learning objective may be assigned to specific analytics for each of the phases, Submission and Reviews. The best practice here is to understand what Analytic or Analytics your LO covers. Is it about creativity of the piece, then Submission: Attainment would be the logical choice. This data feeds into the Learning Assurance Report seen in the Measuring Performance section.
Default Learning Objectives
When Add Default LO is clicked, three Default LOs appear: Creativity, Communication, and Collaboration.
You may review these as reference or keep them and use them. If you choose to delete a LO, simply click the trash can icon.
New Learning Objectives
When Add new LO is clicked, a blank LO form appears. Enter the information you wish to provide in the fields.
Saving the Assignment
Once you have filled out all of the information to create an assignment, click to successfully create the Assignment within the Mobius SLIP system.
Repeat these steps for each subsequent assignment. When you are finished, jump on over to Collecting Permission Slips: Enrolling your Students